Wednesday, January 28, 2009

Cool green displays can double as home decor

I was making some new displays today for my booth at this year's Craftstravaganza, and thought it might be worth sharing because I could see these things being used in someone's home as well. I wanted to get a tiered counter top basket display to hold my loose beads for people to dig through, much like this display. But, then I thought to myself, silly me...why should I waste any of my precious margin on a stock fixture like this? I mean, I AM an experienced retail fixture designer after all, and the business that I am designing these displays for is all about repurposing old stuff.


So, after recovering from my momentary lack of judgement, off to the thrift store I went! In one stop at Saver's, I found some heavy brass candlesticks in varying heights for the tiered effect, and three sizes of baskets. ( I also found a miniature mailbox that I will paint and use in my display, going with the junk mail theme of my work.) All of these items cost me about $10-$12. (Most thrift stores have an entire aisle of candlesticks and at LEAST an aisle of baskets.)


So, here is what you need to know to do this fun DIY project:
STEP 1: Glue candlestick to basket.
STEP 2: Spray paint the whole thing.

DONE! What a simple project. I could totally see these being used on a dining room table to hold some fruit, a plant, some potpourri, or a grouping of candles. You could even use something else in place of a basket, like a pan, plate, or bowl. The possibilities are endless. I went for wicker so the base would weigh much more than the top, keeping them stable when shoppers dig through the beads. I was hoping to find a candeabra with several arms on one base, but I think these worked out nicely and still gave me the tiered effect with the flexibility of arranging them however I please:


For what shipping alone would have cost me for that stock fixture, I made something unique and totally within my Junk Mail Gems brand...not to mention a cool item to use in my house and a great DIY project to share with you!

Saturday, January 24, 2009

Craftstravaganza '09 - Mark Your Calendars!


I am happy to announce that Junk Mail Gems has been selected to show among 63 other fantastic indie artists at this year's Craftstravaganza in St. Paul.

You may remember my posting from last year, my first year at the show, which by chance happened to be during one of those freak (yet not uncommon in MN) spring snowstorms! Last year it was held toward the end of April, but this year will be the beginning of May. So, let's hope the weather is better this year!

There is also another reason to come this year...it is being held on the same weekend (and at the same fairgrounds) as the Living Green Expo! You can check out two great events all in one place. So, my fellow Minnesotans and anyone willing to take the trip to St Paul, Minnesota, be sure to mark your calendars for Saturday, May 2nd from 9:00-5:00! The first 100 people get a sweet bag full of goodies so get in line early. This year I am going to try to get some items pulled together to add to the bags!

Monday, January 12, 2009

What to do with your old 2008 calendar?

It's 2009, and that calendar on your wall or desk is now officially useless...or is it? I was just about to toss mine in the recycle bin until I stopped and realized that it could be repurposed instead!

Here is a nice lampshade made out of a recycled calendar, featured on Craft blog:


You can even find instructions and a template to make envelopes out of recycled calendars here.

Or, make your own template by carefully dis-assembling a junk mail envelope, and then trace around it as your pattern!

If you have one of those giant desktop calendars with big numbers, here's a great idea to use it as gift wrap:


And don't forget all of the DIY projects on Junk Mail Gems.com that can be done using calendars as well, including the gift bags and ornaments!


How about those little desktop page-a-day calendars that are such popular holiday gifts? If tearing off a sheet of paper and tossing it every day makes you uneasy, simply tear them off and stack them up in a box on your desk, and use the backs as scratch paper!

Unexpected home interiors


Oscar the Grouch may not have had it so bad living in a garbage can, after seeing what this guy can do with the inside of a garbage truck...


I just received these photos via email from a friend, although after looking it up, I've apparently been living under a rock (or a pile of junk mail), because it's been all over the blogosphere since at least last summer. But, I thought I'd share it again here for those of you who may have missed it like me!


It's pretty amazing what a little organization of only the necessities will do for your living space.


People should not judge books, and apparently homes, by their cover...there are so many amazing homes out there that don't look anything like homes from the outside! With some creativity and patience, people are recycling all kinds of structures into beautiful homes.

How about this chapel turned into an amazing home:


or this grain elevator turned into a home:


Here is a train car home in Portland:

Wednesday, January 7, 2009

The recycled magazine work of "Danny O"


I just hung up my 2009 calendar in the Junk Mail Gems studio...featuring the art of Daniel O'Connor (aka "Danny O"). It's really a fun calendar full of his work, which is made up of a collage of magazine paper.


This one is my favorite although it is not in the calendar:


Ever since I was little, my mom used to set us up at the kitchen table with some glue, paper, and a pile of coupon ads from the newspaper, magazines, etc. We would cut out shapes and make our own collages.

Collages are a great way to re-use, and just plain fun project for kids. It gives them an opportunity to create artwork by including images of things that they may have a hard time drawing otherwise...plus, what kid doesn't like using scissors and glue? Kudos to Danny O for turning his passion and talent into a professional fine art career!

Monday, January 5, 2009

Travel Neck Wallet out of an Airline Safety Card


I'm going to be going on my first international flight to Paris this spring. Last night I was browsing the web, trying to find a neck wallet for the airport that was not UGLY.

I really liked this cool "F1 Safety Passport" holder decorated with graphics from a flight safety instruction card. But, I was looking for one to hang around my neck while in the airport, and this had no strap. So, I decided to make my own!


I actually happened to have an airline safety card in my studio, and some clear vinyl I bought for some other Junk Mail Gems product development, which were the main materials. I used some green ribbon that was left over from a previous project, a couple metal rivets to thread the neck strap through, and one of those spring loaded things to adjust the strap from some other item I had recycled.

I approached it like any other product design project I've had. I gathered together the documents I need in the airport, and did some experimenting, building a prototype with scratch paper and tape first. I put some string on it, wore it, and figured out how I wanted it to work before making the final product.


Above: The front flap opens with a velcro piece to reveal two clear pockets. One holds my driver's license, and the other is for whatever else I need...cash, credit cards, etc.

Below: The rest of the wallet folds open to reveal a pocket accessible from the side, large enough to hold cash, my passport, and any folded travel documents/tickets. There are also two more pockets on the inside face to hold cards.


All faces of the safety card are enclosed in clear vinyl, and trimmed with ribbon.

I am thinking that a travel neck wallet would make a great addition to my Junk Mail Gems line. I'll definitely be adding it to my list! However, I want to take this one on a test run this spring, and find out how else I might improve it before making some out of junk mail! I'll keep you posted!

Saturday, January 3, 2009

Champagne Chair Contest 2009

I have always loved entering creative contests. Perhaps it is because my siblings and I always entered every coloring contest we came across as kids, winning many fabulous prizes. But as an adult, I really enjoy entering any creative contest that I come across, simply for the creative challenges they pose. On any given day I would never, for example, decide to build a miniature chair out of recycled champagne corking hardware. But, if someone came up with that great idea and offered incentive to do so, I'll jump at the chance.

This year marks the 6th year that I have participated in Design Within Reach's annual champagne chair contest. When the competition was started in 2003, it was a great opportunity for me to invite over all my fellow designers from work (Best Buy corporate headquarters) to socialize, sip some bubbly, make something with our hands, and enjoy the holiday atmosphere. Everyone really got into it, and I've continued to host the "chair building party" ever since.

The basic goal: build a miniature chair, no more than 4" x 4" x 4", out of nothing more than the corking hardware (wire, cork, and foil) from up to 2 bottles of champagne. I love the fact that this year they are being more green about it...entries can be emailed in stead of shipped and then only the ones they select are shipped to their office. Here are my past entries...

2003 Entry
A very simple little chair with woven foil "webbing." This was the first year of the competition, and the only year where they made a poster with the winning entries. It was maybe 1 inch tall. I made several other more impressive looking chairs, and this one at the end of the night out of the last scraps I had of corking hardware. It was charming enough for me to choose as my entry, and I'm glad I did because it made it on the poster of winners!
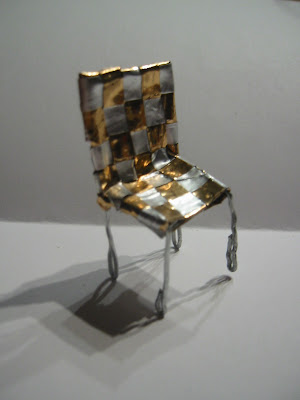

2004 entry
In 2004 they allowed the use of both adhesives and glass. I took advantage of this with my crushed glass chair. The seat and back are made primarily of hot glue, covered with crumbled glass:


2005 entry
In 2005 I went for a minimalist approach with my "spiral chair." It was clean and simple, and apparently good enough to earn an honorable mention and make it into their selection of chairs sent on the traveling show around the country:


2006 Entry
Going in the opposite direction from the previous year, this entry was much more complex. I decided to stretch the definition of a chair, and make a tire swing. But, of course, you can't have a tire swing without a tree to hang it from. I had fun making this tree, and used a leaf shaped paper punch to create all the tiny oak leaves. No winner here...but it is still my favorite!


Last year I did not host a party, being that I had just given birth, and the mere thought of sitting on chairs was painful enough. ;-) But, this year we're back on! I'm not sure what I'm going to do yet...I really never do know until the night I start playing with the materials. But, that is half the fun.

So, if you're celebrating with champagne for any reason this weekend, or still have some corking hardware lying around from your new year's eve celebrations, don't toss it out! Get creative and make a chair...who knows, you may even win something!

Friday, January 2, 2009

Happy new year!

Happy new year!! I hope you had a wonderful holiday. I thought I'd share a few fun green things that I came across during my own holiday celebrations...

The first is a fun green DIY project idea, and a gift that we received from my aunt. She took a recycled wine bottle, stuffed it full of lights, and topped it off with some foliage and grapes, attached with some green floral tape:

It is such a simple idea and really dresses up your table or buffet nicely for parties, etc!

I also got a few gifts that were wrapped in an eco friendly way. I did not snap photos of them but here are some...

1) A stack of books for my little boy were tied together with a home made fleece scarf (from the same friend who had the great recycled birthday party invites in a previous post). Simply cut a strip of fleece, and then cut some fringes on the ends and you have a cozy, no-sewing-involved scarf!

2) A metal bucket filled with goodies (also for my little guy)...a great way to package gifts, and the bucket can be used for toy storage, sandcastles, or in my little boy's case, a drum!

3) A storage bin full of goodies. The past few years my mom has given each of us "kids" a nice storage bin, with all of our gifts inside. It saves a lot of paper over wrapping such a large box, and who can't use a storage bin?!

Those were just a few interesting ideas I got from my creative friends and family...I'd love to hear if any of you came across any new green holiday ideas this year!

I of course enjoyed giving a few green and home made gifts this year, from hand made soaps to vases out of old plates with sentimental meaning, to hand crocheted stuffed toys, and of course, some Junk Mail Gems jewelry!
Related Posts with Thumbnails

What's going on in the world of Junk Mail Gems, along with other cool, hand-made "green" products, DIY projects, and more!