Wednesday, July 30, 2008

Why I'm Jealous of my Shower

I had the opportunity last November to hear one of the founders of Method, Eric Ryan, speak at the Designature conference that I volunteered at here in St. Paul. (In case you're just now tuning in, in addition to being the Junk Mail Gems creator, I am an industrial designer) Ryan, if you happen to come across this blog, you did an awesome job. I was the huge, 8 month pregnant woman who held up time cards for you. ;-)

I still remember the day that the Method Dish Soap package stopped me dead in my tracks at Target. They have such beautifully designed packaging. Since then I never could stop myself from checking out every new product I saw on the shelf with each shopping trip. That is the curse (or blessing) of being a designer.

But, after hearing more about Method from Ryan himself, I learned of it's environmental benefits. The products are made of natural, bio-degradeable, and non-toxic ingredients. They smell great, and, here's the kicker...they WORK. For some crazy reason people today think that for a cleaner to be tough and work, that it has to be poisonous and burn off your nose hairs. I got fed up with giving myself the feeling that I was in a gas chamber ever time I cleaned my shower with Tilex, while my husband (a chemical engineer major) repeatedly reminded me how dangerous the fumes were. I got more concerned about breathing this toxic stuff when I was pregnant, and now that my baby is here, and while I plan on installing those annoying child-proof cabinet locks, I'm thinking that it's worth an extra buck to get cleaners that are not "fatal if swollowed."

So, when I was running errands at Target yesterday I finally picked up some Method cleaning products to try...the daily shower spray and the tub & tile cleaner.


This stuff is great! I must say though, after taking a shower, I was a little jealous that my shower smelled better than me. They could put a "body spray" label on this stuff and I'd spray it all over myself. I happen to have been born with a particularly sensitive sniffer, and it was so refreshing not to have to turn on the vent fan and air out the bathroom after cleaning it to clear out the fumes. I actually wanted to sniff the bathroom more because, like the packaging notes, it smelled like a spa. Mmm... Let's just say that as my other poisonous chemicals run out, I will be replacing them with more Method products to try! It did work just as well, if not better, than the nasty Tilex.

I admit that I frequently make a "green" choice based on reasons other than their green-ness...like compact fluorescent bulbs & cloth diapers because they just save so much money in the long run...and now these cleaning products because everything else STINKS and is toxic for my baby. But, I figure, the planet doesn't care why you went green in the end...it's just happy you got there!

Recycled Light Bulbs

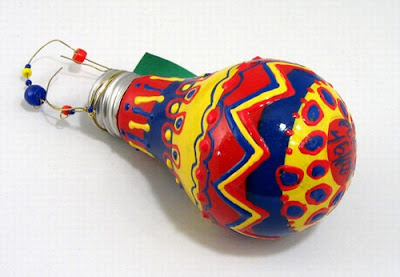
Now that I've switched over to compact fluorescent bulbs in my house, what do I do with the old incandescents as they die off? I just finally discovered this cool blog, Design Sprout, and came across this fantastic project for turning light bulbs into flower vases and salt/pepper shakers:


After more searching I found quite a few fun ideas out on the blogosphere. There are some really cool ornaments made out of light bulbs at 3r:


Bulbs Unlimited also has several cool ways to recycle old light bulbs into new lamp shades!


How about a miniature greenhouse? I just think a bunch of these lined up on a windowsill would look so cool!


This is a great way to turn those halogen bulbs into angels! I have these things in my kitchen...they are expensive and burn out all the time so I'm happy to find this new use for them!

Sunday, July 20, 2008

Recycled Phone Sheep


I have not had a corded phone in years...in fact I haven't even had a land line in over 5 years now. What will happen to these phones when they become extinct? Only the lucky ones will get to retire and live out their final days in greener pastures (or in this case, tile floors) in their second lives as sheep! (via Geekware)

Friday, July 18, 2008

Michelle Stitzlein's Recycled Art

Michelle Stitzlein's work is just too cool for words. Check out her beautiful moth sculptures, made entirely out of recycled "stuff." SO incredible!!


(via eco-artware)

Thursday, July 17, 2008

Recycled Bike Art


I used to often ride my bike to work (in the summer, as this is MN!) when I was working as a display designer for the Best Buy corporate office a little over a year ago. I have a super cool baby blue Electra bike...I can't wait to get back on it! I didn't ride last summer as I was very pregnant, off balance and top-heavy...and this summer my baby boy is still too small for the pull-behind cart I got. But, next year I'll pump up your tires and get you out of the garage, girl, I promise! In the meantime, I'll check out other people who bike and the creative things that these ladies have done with recycled bike parts...

Check out this great artwork made out of recycled bike parts! Angela Armstrong and Angela Kelly of Maine have a beautiful selection of everything from wine glass charms to coasters to framed art. Wonderful work, ladies!

Wednesday, July 16, 2008

DIY - Turn an Old Plate into a Mosaic Vase


The folks at Eclectic Products (who make the EcoGlue I use for my Junk Mail Gems products) recently asked me to be a guest blogger and share a project using EcoGlue. It has been posted today...check it out here at the Eclectic Blog for step-by-step instructions to turn an old thrift store plate into a beautiful mosaic vase!

Tuesday, July 15, 2008

DIY - Make Your Own Cloth Diaper Insert Sock


Okay, one last cloth diaper related post. This is the tutorial on making your own cloth diaper insert "sock" that I promised I would post. Above is a photo of the one I made for $0.47, next to the one I bought from Cottonbabies for $2.99. Can't tell the difference? That's the idea. I'm sure Cottonbabies won't be thrilled about me posting this, but I think I've given them enough free advertising in my 4-part cloth diapering adventures postings, plus have spent hundreds with them already, so that's how I'm justifying it! ;-) This is at least one way you can save some money...


Click on this image above to see the instructions larger. It's really very simple! These are worth making (or buying from Cottonbabies). Slip an ordinary cloth diaper in them and they act like the fancier BumGenius diapers: soft & fuzzy and keeping the moisture off of baby's skin.

1) Cut a piece of 6.5" x 34" microfiber. I couldn't find anything called specifically "microfiber" at my fabric store but found something called "buttersuede," which felt the same, was made with the same material, and worked just as well in the end. It cost me $4.19 for a yard (30% off on sale), which made 9 socks. Here's a close-up below...you want it to be slick on one side and fuzzy on the other:


2) Fold about 1/4" over on each end (slick sides together) and iron. Sew these seams.

3) Flip the whole thing over so it's fuzzy size up. Now fold 2" over on one end. This will be the overlapping flap that covers the pocket opening. Iron.

4) Fold the other end over to lie flush with the fold you just ironed.

5) Sew down each of the two long edges.

6) Turn it inside out and you're done!

Monday, July 14, 2008

Cool Recycled Electronics


I know, I know, my blog has been a bit diaper-obsessed lately. So, here's another little something not diaper related for the rest of you! Here is some more cool jewelry made out of cell phone buttons over at Secco! This looks like it would be a fun project to make as well. I imagine it's pretty easy to stick a needle & thread/wire through the rubber buttons to string them together.

Check out their site as there are many other cool recycled items, like these cool reptile magnets made out of circuit boards:

Greening Mommyhood - Part 4

(See Part 1, Part2, & Part 3 if you're interested in my cloth diapering adventures!)

My next shipment of cloth diapering supplies arrived from Cotton Babies and I have some more reviewing to do!

Items I ordered:
1 Kissaluv's Contour diaper
1 Cottonbabies One-Size Insert Sock
1 BumGenius 3.0 All-in-one diaper
1 BumGenius Diaper Sprayer
6 more Chinese Prefolds

COMBINATION 5: Kissaluv's Contour + Bummis Whisper Wrap


The Kissaluvs contour diaper was interesting. They have a "super soaker doubler" sewn right in (above center), so I thought it would be pretty absorbent. They are nice and soft as well. The benefits I saw over using my other prefolds is that it was slimmer in the crotch, they come in colors, and you don't have to do any folding because it's already shaped like a disposable. Mine seemed to soak through pretty quickly though, and while the Bummis wrap continued to keep the wetness in, I didn't think those few benefits really justified paying $6 for one cloth diaper when I could get many more prefolds for that price. So, while I wasn't horribly disappointed with them, I don't think I'll purchase anymore of these contours. I'd rather put my money into nicer all-in-one's than these prefolds that didn't really absorb any more (or as much) as my current prefolds. But, I continue to use the Bummis wrap every night and it works well!

I also thought that when soaked through, which happened quicker to this than my Chinese prefolds at night, the shape basically totally wraps the baby in wet diaper. At least with the prefolds in the Bummis wrap, the wet diaper is just through the crotch, not wrapped around the sides too. Maybe this is no big deal but it was another reason I'd rather just stick with the prefolds I have...wet cloth against less of my baby's already sensitive skin.

After having a couple of those stickier poopy diapers where you can't just drop the "business" into the toilet, and having to swish the diaper in the bowl, I decided to make the $40 investment in the diaper sprayer. After doing the old swishing move, standing there with a diaper dripping with toilet water prompted me to go pick up another diaper pail to keep in the bathroom. There was no way I was going to run that thing across the hall into my baby's room while dripping all over!

I tried installing the Bum Genius diaper sprayer myself as they say it's so easy and it came with some very well illustrated instructions. However, the toilet was leaking like crazy before I could finish so I put it back the way it was and set that aside for my hubby to try later. He did get it installed successfully and it sure does take away from the gross factor of dunking the diaper in the toilet bowl, and the pressure takes the poop off very easily. I still am glad I got another diaper pail near the toilet to minimize toilet water drippage across the floor! If anyone else has suggestions to avoid that I'd love to hear them. I did just spot this contraption online for wringing out the wet diaper, which may be worth a try, although with the sprayer I don't have to do the dunking/swishing maneuver.

COMBINATION 6: CottonBabies Insert Sock stuffed with Gerber Prefolds + g Diapers


I also ordered one of these CottonBabies insert socks for $2.99. The idea with these is that you can put an insert (absorbent cloth that holds the pee) into one of these, and the microfiber fabric will keep your baby feeling dry, much more like a disposable does. This worked pretty slick, and I used this solution coupled with my g diapers. I got some of the "premium" Gerber prefolds (nicer than their Birdseye Prefolds, but not as bulky as the nicer Cottonbabies Prefolds) I really liked this combination...I previously reviewed the g diapers as my favorite so far and this addition was the cherry on top. (why I keep using food analogies with diapering, I'm not sure) I think this would also make it easier for Dads and babysitters to have a bunch of stuffed socks ready to go into the g diaper or bummis wrap because it keeps the diaper all folded nicely how you want it. No worries about dropping the diaper in the middle of the night and having to re-fold. Although it is an extra step to stuff the sock, I think it's worth it to keep baby feeling dry (and in turn, sleeping longer at night!). The fabric is a microfiber, and I found I could make these much cheaper myself. Check out my tutorial to make your own! As long as the test of my home-made socks works, I'll just make more of these.

COMBINATION 7: BumGenius 3.0 with both included inserts


I also ordered one of the Bum Genius 3.0 diapers, and I must say, if my budget were limitless, I'd almost use these exclusively. They are the ultimate when it comes to not giving up any of the advantages of disposables...they go on just as easy (SUPER Dad and sitter friendly!), and they keep the wetness off of baby's bum just as well. I decided to max mine out and give it the biggest test right of the bat. I stuffed the pocket with both of the inserts that it came with and put it on my little guy at 1 am. It remained dry and fuzzy against his skin, and it wasn't until about 6 hours later that it finally leaked on his pj's, probably due to my first attempt at insert-stuffing because it hasn't leaked since. While he had a wet spot in the morning on his clothes, I couldn't even feel a wet spot on the diaper, just the insert which were supposed to be wet. So, two thumbs up and 5 stars for Bum Genius! I've had NO leaks since the first time I tried it and decided to go against my cheap nature and invest in a 12 pack! The price tag is a shocker, but after trying all these options, I decided it was worth it in the long run. Especially when you factor in that these are one-size, and can grow with your baby, so no need to re-purchase when you need a bigger size! I can't wait for my shipment to arrive! Getting 12 at once I believe saved me about $10, and then I was able to get another 5% off using a coupon code, which was another $10. I love a deal.

So, having just invested $200 just 12 of the BumGenius diapers on top of all my other experimentation and having found a few combinations I am very happy with, I am going to end my cycle of buying-and-trying.

My final favorite combinations:

Daytime:
- g Diapers stuffed with a thinner prefold (Gerber Birdseye or Premiums)
- or BumGenius 3.0

Nighttime:
- g Diapers stuffed with a Chinese Prefold, if possible in an Insert Sock
- or Chinese prefold wrapped with a Bummis Super Whisper Wrap
- or BumGenius 3.0 rocks day or night!

This is the system that has worked best, at least for me and my baby. Of course, it may change as my baby grows, and all babies are different. But, I hope this has been somewhat helpful for anyone else out there interesting in taking the cloth diapering plunge!

Before I end though, I do have one other question that I'd love to poll you other experienced, green, cloth diapering mommies on. So far the few times I've had to change cloth diapers while away from home, I've continued to use my "diaper duck" bags because they are waterproof plastic and nicely scented for sticking a wet or dirty diaper back in my bag to bring home. This has been working fine, but I'm curious if anyone else has any better ideas for ways to transport the dirty diapers back home. I feel a little silly having to transport cloth diapers in another disposable plastic item! Also, what do you do with a poopy cloth diaper away from home? I just don't want to dunk a diaper in a public toilet and then stick it in my bag! So far I just put them in the diaper duck bags, poop and all, bring them home, and take care of it there. I'd love to hear any of your suggestions!

Sunday, July 13, 2008

DIY Project: Placemat into Diaper Clutch

I've got a good green, DIY-er mommy project for you today!

So here's how this little project started out. I was getting tired of lugging around a big diaper bag on short errands just in the rare case my baby had a blowout away from home, when I almost never even open it. I wanted to get one of those little diaper change clutch thingies that just hold the essentials for one change: diaper, wipes, changing pad, that would fit into my purse. (or now, my big Mommy bag)

Then I decided to go to Target and check out the diaper wallet they had for $16.99. I had seen it on another trip but then couldn't find it. I thought it was too expensive but I was getting desperate. I then saw that they had this little diaper pouch thing for $9.99 which I thought was also rediculously over-priced for a pouch with a velcro flap that would have taken me 5 minutes to make. This is where I decided that I could totally just make my own and save money. Yes, many of my DIY projects stem from my cheap-ness coupled with my constant desire to have a project going. On my way out I came across these placemats on clearance for $1.98 on an end cap:


I thought it was a cool blue pattern and decided to pick a couple up and use the fabric to turn into my own travel sized diaper changing kit. So, this is how my logic went on this project, and after I had purchased these placemats I thought...duh, I could have gotten some at a thrift store and re-purposed something that was already used. But, alas, I was thinking in the wrong order. I decided this was still a cool, simple project to post here and suggest that you try it out with some old placemats. I always see tons of them at thrift stores and garage sales so it's another great way to recycle something!

So, here is what I did: (illustrations by GF Design ;-)


1) Get a placemat! Better yet, get two. You can fold up the extra one and stick it in the holder at the end as a matching changing mat! Or, use it in case you mess something up on your first try.

2) lay your travel sized wipes container on it to measure the height, add a couple inches, and trim off the top excess. Save that scrap as you'll use it later!

3) With the outside pattern you want facing up, fold the ends in to create the two pockets you'll have to hold diapers on one side and wipes on the other. Just make sure that when you fold the pockets in that the wipes container just takes up half the width, so you can fold it over on itself when done.

4) Sew the edges of the two pocket ends. Then, turn the two pockets inside out so you now have the pattern on the outside.

5) You'll find the edges curl up a little from sewing the pockets and turning it inside out, so this is where I ironed a seam and sewed them down where shown in the illustration above. It's probably not absolutely necessary but I thought it gave it a more finished look.

6) Take the scrap you cut off and sew the raw edge shut, attach some velcro, and then attach the whole works to the holder as a strap to hold it shut!

And you're done!


Mine is now equipped with a cloth diaper and cloth wipes! I will have more reviews from my cloth diapering adventures coming soon too, by the way!


If any of you try this, I'd love to post pictures of yours, so feel free to send 'em my way! Contact me through my website and I'll reply with an address for you to send attachments to! (Sorry, I dare not post my email address straight out as I already get literally hundreds of spam messages per day! If only I could turn electronic junk mail into gifts as well!)

Saturday, July 12, 2008

Groovy Recycled Vinyl Jewelry!


I only have a few minutes until I have to run off to my brother's wedding, but I wanted to quickly post something cool that I just came upon online... Check out this "groovy" jewelry made out of recycled vinyl records! These two are my fave, but there are a ton more over at Vling's website!

Tuesday, July 1, 2008

Gatherer Jacket

I haven't posted in a couple days as I've been having too much fun working on my guest blogger project for Eclectic Products' blog! I'll be sure to post a link when I finish and they post it. I've also been working on some new Junk Mail Gems products, and getting a little more cloth diapering experience, including some poopy diapers. So far so good still...I'll post more comments once I place my next order for things to try and I've given them a whirl!


In the meantime, check out this cool Gatherer Jacket by Merrell (via Inhabitat). Need a little more insulation? Simply un-zip the jacket and stuff with whatever you have on hand. Might I suggest shredded junk mail? ;-)
Related Posts with Thumbnails

What's going on in the world of Junk Mail Gems, along with other cool, hand-made "green" products, DIY projects, and more!