Tuesday, December 23, 2008

12-25 Guests + 1 Table that seats 6 = Creative Problem Solving!

On Thursday I will be cooking and serving turkey and ham to 12 family members. On Friday I will be hosting a 1st birthday party, for over 25 people. My kitchen table seats 6. So, naturally, I thought I'd get my creative wheels turning to at least figure out a way to make it easier for a few more people to eat, after maxing out our kitchen table and possibly a card table or two.

Here is what I came up with. I made a couple trips to two different thrift stores before I found some decent tv trays...decent referring to the fact that they were not broken and were not loose and wobbly. I was able to find 3 matching TV trays at my second stop, and snatched them up for $1.99 each. I am kicking myself for not taking a "before" photo! But, to give you a general idea, they had some fake woodgrain tops and gold legs, with at least two rubber feet missing from each table's legs.


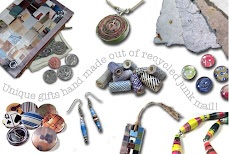
I wanted to make them more unique, and possibly bring them into the 21st century. So, I dove into my stash of junk mail, of course! The tray in the top left is made from squares of various security envelope patterns. The one in the center is tiled with those fake credit cards you get with applications...I've been saving them for something and knew I'd find a use! The one on the above right is made out of some extra pieces of woven junk mail, which were trimmings from making some of my checkbook covers. (I usually turn them into bookmarks but had tons left over anyway so this was a great use.)

First I spray painted the edges of the tray tops silver. These tops are made so that you can easily remove them completely from the legs, so that part was easy. After affixing my "junk" to the trays, I thought I'd do a little experimentation with some Shellac. For the fake credit cards, I brushed on a couple coats, and then poured on a thicker layer. I did that several days ago, and it's still not quite dry. So, we may not be able to use that one this weekend. But, once it does dry, I think I'll continue to brush on a couple more coats and call it quits:


With the other two I just applied several coats with a foam brush. The woven junk mail looks pretty cool:


It too is still a bit sticky but should be use-able by Thursday. I think I'll add some more coats again after that to seal it up a little more.

I got some replacement rubber feet from one of my favorite hardware sources I've used frequently as a display designer. They were maybe $3-$4 for a bag of 100. I only needed 12. So, if anyone needs any rubber feet that fit a pipe with an outer diameter of about .5", let me know!

So, that's my latest project, born out of necessity... We at Junk Mail Gems (and by "we" I really mean "me") wish you a happy, safe, and healthy holiday and new year!

Friday, December 19, 2008

Use Old Photos & Canning Lids to Capture Holiday Memories!

Here's another fun DIY Christmas decoration idea that my mom came up with. This has been hanging up in my parents' house for as long as I can remember. She used some old canning lids, felt, and ribbon to capture and display past Christmas memories.


Note that the bottom photo you see here is me and my brother & sister with our new Glow Worms by the Christmas tree. Good times...good times...

If you're not a canner yourself, ask around. You may have some friends or relatives that do canning who might have some lids for you to recycle. Use a circle template (or make one out of scrap cardboard) to make it easy to draw circles on old photos and cut them out to fit the lids. Cut out the photos and glue to the lids. My mom also put some tiny garland trim around the lids, but you could also use glitter, or whatever else you have around.

Cut out your felt pieces to be larger than the diameter of the lids. My mom cut them in a wavy pattern. You could do this, or make them smooth, or use pinking shears for a zig-zag. Line them up and glue the ribbon to the felt, making sure to leave a loop at the top to hang. Then, center your photo lids on the felt and glue down!


My mom also put a "Christmas Past" title on top, and added the year to each photo. If you're a young family just starting to create your holiday memories, leave some extra ribbon and add a new one each year!

This is something that you could really do with any holiday photos as a decoration...Halloween, Thanksgiving, etc. Just change the colors of the felt and ribbon to match the season! Sure makes a great decoration to hand on a narrow wall space or post, too!


Hey Mom, got any more of those lids around the house? If so, I'll take 'em! :-)

Wednesday, December 17, 2008

DIY Christmas Gifts from Inhabitat


Inhabitat posted some really great DIY gifts yesterday...check them out!
My favorites are these cork coasters and trivets above. I have such a huge stash of corks now, I'm trying to figure out how else to use them! The crochet owls are pretty dang cute as well...


This was an earlier post also from Inhabitat, but are so adorable I had to include them as well:

And don't forget to check out all the junk mail diy projects on my page while you're at it!

Monday, December 15, 2008

Recycled Christmas Placemats!


Over the past couple years I've shown you how to recycle your old holiday cards, junk mail, and gift wrap into many festive new objects, including ornaments, gift tags, countdown paper chains, mini gift bags, and scrapbooks (via last month's e-newsletter). What else could there be to use all this old "trash" for?

Today's fantastic recycled Christmas placemat project comes from none other than my extremely creative sister Heidi, of iBusybodies.com! This is a great project to use up those old holiday cards, gift wrap, holiday-themed junk mail & catalogs, and even those PHOTO cards!

Here's what Heidi did...

Cut squares out of all the recycled items you want to use.

She used this square punch, and used the corner rounder (below left) on the corners when finished. I don't have a square punch, so I made some using my cutting board, cutting 1.5" squares.

Here's the fun part that will really personalize your placemats...use photo cards you get in the mail too! Make sure to center the squares around your friends and family's faces. You may want to hand cut or use a cutting board for this so you can see what you're doing.

Then, simply stick down the squares on your larger paper until you fill it up. Heidi used a double-stick tape applicator made for scrapbooking on the back of each square. When I made mine, I laid out a long strip of double-stick tape on my paper backing and stuck the squares to it.


Trim off edges where necessary, and round the corners if you choose. Then, so they can stand up to spills and drips, have them laminated at Kinko's or your print shop of choice.


And you're done! These placemats will be even more fun to look at in years to come as the photos of friends and family get older! Top them with a recycled holiday light napkin ring and you're sure to start a conversation with your guests! Thanks for the great idea, Heidi!! And, kudos to my mom, Rollie Brandt, who took all the great photos!

Sunday, December 14, 2008

Fun Recycled Food Package Lights

I stumbled on this fun blog, Fidgety Fingers, a few days ago and have added it to my list of favorite links on my site. Much like Junk Mail Gems, t's full of fun things made out of salvaged materials.

This was one of my recent favorite posts on Fidgety Fingers...these cool lights made out of packaging with tiny pin pricks in it by Anke Weiss:


So cool! I definitely have to add this to my list of things to try down the road!

Friday, December 12, 2008

My (growing) Favorite Toy List

I've been keeping my own list of cool toys as I find them, for future gift ideas for my little guy, and thought with the holidays coming up and shopping days dwindling, it would be a good time to share! I've really been leaning toward some of the more well made wood toys and eco friendly toys. There's just something about the experience of playing with a well made toy that doesn't involve batteries or video screens.

I bought a Wheely Bug for his upcoming first birthday. It is a very well made toy that I expect to have in our home for a very long time. It has a nice, brightly colored, squishy body, on a plywood base. The casters allow your child to go in any direction, so they won't get stuck in the corner. I have a feeling he's going to love this, now that he's on the move!


Ecotronic is one of my new favorites that I just discovered at the mall today. Ever seen those wind-up flashlights? These toys are built on the same idea...simply wind them up and you get electronic toys with no batteries! Packed in biodegradable, easy to open packaging, these toys are green all around! My favorite is Mr. Robot Head. It's like those games at the state fair, where you have to try to move the ring around the coiled wire without touching it. The lights and noise it makes when you touch the wire is so fun, I think it's just as fun to lose this game as it is to win! I'm totally going to get one of these for myself because I just can't wait long enough for my little boy to be old enough to try this!


I am definitely going to get my little guy some Automoblox, which have been on my list since before I was even pregnant. Maybe when he gets old enough to start driving his cars around and making motor noises. The vehicles can be taken apart, allowing your child to build their own car, and even fill it with little people:


Sprig Toys has some really cool "explorer vehicles," which make sounds, music, and lights, using a generator when the child pushes the car. They are made out of "sprigwood," which is their durable bio-composite material (recycled wood and reclaimed plastic).


A friend sent me a link to these cool I Spy bags on Etsy. These little EcoSpun fleece pouches are filled with tiny trinkets and treasures to find, swimming in BPA free pellets. A list of the bag's contents on the back lets you know what to look for through the clear window in the bag! A great, simple, non-electronic toy that will keep your little ones busy and maybe even quiet for a while!


I already have a couple of these little Animalz toys for my little munchkin. I got them for 50 cents at a garage sale! They are just super cute, and they help me keep my guy somewhat still on the changing table:


Playmobil toys have been around for a while, and I remember playing with them when I was a kid. So, naturally, I'd love to get some for my own kid. They have many cool sets, including dinosaurs, a pirate ship, and even a nativity scene if you are looking for a good Christmas item:


That is my current list, but it is always growing. I'd love to hear your favorite well made and eco-friendly toys...feel free to leave comments if you'd like to help me grow my list!

Wednesday, December 10, 2008

Turn Food Coloring Containers into Elves

'Tis the season for corny holiday crafts!!!

Normal people would see the below object as an empty food coloring container. Weird people like me, however, see a little elf. No, seriously...see the pointy hat?


Okay, maybe this will help:


I made this one in like 5 minutes so he's not the best looking elf, but you get the idea. I know, I know, this is a TOTALLY cheesy Christmas craft. But, hey, I think it would be a fun one to do with the kids. Just make sure you wash out the containers yourself first! This stuff can get messy, as you know if you've made any spritz cookies this season.

I decorated my elf with ribbon, a green paint pen, and a sharpie (with paper ears). But, I'm thinking paint and a brush would yield cuter results...next time...


I took a pliers and pulled the little red spout off of this one...then it's easy to run water inside, shake it around, and get it rinsed well. Let them dry well too. You can see I was not so patient with my elf above and he's full of moisture.

Naturally, the red one has to be Santa:


I happened to have the google eyes, yarn, pom pom and curly hair in my stash of old project left-overs. The nose it made using the tip of the bottle. I think next time I'd paint on some smaller eyes so Santa doesn't have that reindeer-in-headlights look. But, the whole point is to have fun and be creative! Recycle some scraps of ribbon, felt, or whatever else you have around!

I stuck a magnet on the back of each of mine, but you can just as easily leave them to sit on a shelf. You can get magnets at craft stores...I tend to have tons of them on hand for making my junk mail magnets.

Ribbon Storage out of a Recycled Food Canister


I saw this idea for ribbon spool storage in my latest issue of ReadyMade, using an old cookie tin. I thought I'd try making one out of a baby snack canister that my little guy just polished off today.

1. Take an empty food canister and cut two parallel slits into it. I am using a baby snack canister which is cardboard, so it was easy to cut through with a knife:


2. Cut tiny connecting slits on top and bottom to completely remove your ribbon slit:


3. Cut a piece of decorative paper for the outside:

I am using a left-over scrap of gift wrap to cover this one. You could use any kind of paper you have around, including junk mail, of course!

4. Using the adhesive of your choice, glue the paper around the outside of the canister:


5. Cut the slit out of the paper:

(TIP: hold the canister up to the light and you'll see the slit shine through on the other side, giving you a guideline to cut.)

6. Drop in your spools, fishing the loose ends of ribbon through the slot:


And you're done! A stylish way to store your ribbon spools!

Check out my past posts for ideas to turn your food canisters into a battery recycling container or snack storage!

Turn Dead Christmas Lights into Napkin Rings!


Yesterday I finally replaced the broken lights with working ones for my mini Christmas, which I then set up in my studio. If you decorate for Christmas, like me, chances are you've tossed out plenty of dead light strings over the years. After all, they are so cheap now, it's just not worth the time to inspect every bulb to find the one that needs replacing. So, last night I thought I'd come up with a project to recycle these lights into some festive holiday table decor.

I remembered back in grade school, we used to make napkin rings for Christmas out of toilet paper tubes and yarn. We'd cut about a 1" ring off the tube, wrap yarn around the whole thing, and then staple a little piece of garland on for some decoration. (I hope to offer some junk mail napkin rings on Junk Mail Gems in the near future too!) This childhood project spurred another idea for me to make napkin rings out of lights. To keep in the Christmas theme, I used a cardboard wrapping paper tube instead of a toilet paper tube, but either will work. Here are the raw materials...things you find most people toss out during the holidays:


The first thing you have to do is separate the light string. These mini lights are made up of two wires, twisted together. You'll have to take a scissors or wire cutter and cut off the plug, then cut the other end open. Un-twisting them takes some time to do, but I found it easier if I wrapped what I separated as I went. I wrapped around more pieces of wrapping paper tube, which also gave me something to hold on to while I un-twirled the wires. I basically sat on the couch with my foot on the cord, spinning these two tubes around each other and rolling as they separated:


Once they are separated, use a pair of scissors to cut some 1" thick rings off of the wrapping paper tube, and start wrapping with lights! This takes a little time as well, as the lights tend to catch as they pass through the tube. But, it's a great project to do while watching TV, or to keep your kids occupied! Make sure the wires are closely pushed together as you go. I found it helped to crease them around each bend with my fingers as well. Once you get to the end, simply tie the end to a piece of the beginning, hiding the knot inside if you can.

This I believe was a 50-light string, so not a big one. In the end I got two napkin rings out of it:


Insert napkin and place on the plate... Voila! A beautiful, festive table setting for your Christmas dinner! These lights are clear, but it would be very cool with colored lights. I even thought of painting each bulb to add some color, but I think they still turned out pretty cool!

Now go out there and get yourself some LED lights to replace the dead ones, and you're set!

Sunday, December 7, 2008

Pop-Up Junk Mail Christmas Cards


I just finished making my 2008 Junk Mail Gems Christmas cards, and had to share, since this is something that pretty much anyone can do!


These cards are made out of 100% recycled junk mail and are sure to get a reaction. If you are a pop-up fan, then you already know of Robert Sabuda's fantastic work. His website is full of easy tutorials for making your own pop-up cards, and this is where I found this reindeer pattern. I added the red nose by simply using a hole punch on a piece of red junk mail and gluing the resulting dot on one side of the folded nose, and then painted on the eyes. The piece on the left side that I wrote on is the inside of a security envelope. I used a menswear catalog for the main card and the reindeer...the front and back covers, since they are a thicker stock.

In retrospect, I should have designed the cards to fit inside a business reply envelope, which I could also have recycled. Well, I guess there's always next year!

Check out Robert's tutorials if you either have a lot of time to make cards, or a small mailing list! :-)

Saturday, December 6, 2008

Turn your junk mail into cool gift bags!

There are less than 3 weeks left until Christmas! Chances are you're out trying to get your shopping done this weekend, and if you're like me, you'd rather spend your money on a nice gift than purchasing a bunch of gift wrap. There is no reason that you can't get a nice gift, AND wrap it uniquely, without spending a small fortune!


I have just uploaded a new DIY project to my Junk Mail Gems DIY page...now you can turn your junk mail into one of a kind gift bags! I have a pdf that I created just for you wonderful readers, available for download on the tutorial page, which is sized to fit on a standard letter sized paper for you to print out. The result is a gift bag that measures about 3" x 2" x 4.25".

In this gift bag shown above, I used a page out of a Macy's catalog that has pictures of flatware, which will be perfect to give the Macy's gift card I just got as a wedding shower gift. Get creative...there's probably a lot of holiday themed junk mail coming through your box, so why not take advantage of the colors and patterns and make up some cool bags!

I used some string from a gift bag that was torn and no longer use-able for handles. You can do the same, or use any other string, ribbon, yarn, etc you have around the house.

Don't forget to FILL your junk mail bag with a cool gift! May I suggest some cool Junk Mail Gems jewelry, perhaps? ;-) Be sure to check out our gift section as well, for special package deals, gift wrap, greeting cards, gift certificates, and more! Happy wrapping!

Thursday, December 4, 2008

Recycle Your Left-over Turkey!


Hello everyone! I know I've recently done a food related post, but 'tis the season to talk about food so I'm posting another. It's been a week since Thanksgiving, and if you're like me, you made an extra big turkey so you could enjoy the left-overs, and are now wishing you had made one just a bit smaller. How do you use (Recycle!) your Thanksgiving turkey?

Last night I found a good recipe on AllRecipes (my all time favorite recipe site!) for turkey pot pie. It turned out great, so I thought I'd share the recipe with you!

This recipe didn't have a crust recipe, so I used my Mom's pumpkin pie crust (shared on my last foodie post):

Crust for TWO 8" or 9" pies (or in this case, one pie with top crust):
2 C flour, 1 tsp salt
2/3 C + 2 Tbsp shortening
4-6 Tbsp cold water

Measure flour and salt. Cut in shortening. Add water. Shape into ball, divide in half, roll out, place in pan. Save other half of dough for the top. Do not bake or prick the bottom.

Turkey Pot Pie!

Ingredients:
  • 1/4 cup butter
  • 1/2 cup chopped onion
  • 1/2 cup chopped mushrooms (I left this out since my hubby doesn't eat them)
  • 1 tablespoon minced garlic
  • 1/3 cup all purpose flour
  • 1/2 teaspoon dried sage (I was out of this but will use sage next time!)
  • 1/4 teaspoon dried thyme
  • 1 1/2 cups prepared turkey gravy
  • 1/2 cup water
  • 1/2 cup milk
  • 1 (14 ounce) package frozen mixed vegetables, thawed and drained (I used left-over already cooked frozen veggies from Thanksgiving and another meal this week)
  • 3 cups cooked turkey, cubed
  • salt and ground black pepper to taste (optional)
  • 1 pastry for a 10-inch double crust pie (see my recipe above)

Directions:

  1. Preheat oven to 425 degrees F (220 degrees C).
  2. Melt the butter in a large saucepan over medium heat. Stir in the onions, mushrooms, and garlic; cook until tender, but not browned, about 5 minutes. Stir in the flour, sage, and thyme until blended. Pour in the gravy, water, and milk, stirring to blend. Bring to a boil over medium-high heat; cook 1 to 2 minutes. Stir in the turkey and vegetables, and cook until vegetables are tender, about 5 minutes.
  3. Line a 10 inch pie plate with the bottom crust. Pour in the turkey mixture. Roll out the other half of the dough from the crust and cover with the top crust. Seal and crimp the edges. Trim excess off edges with a knife. Pierce top crust in a few places with a fork. (I made some slits in the center with a knife) Cover the edges of the pie with strips of aluminum foil.
  4. Bake in preheated oven for 25 minutes. Remove foil strips, and bake until crust is golden, about 20 minutes more. Remove from oven, and rest 10 minutes before serving.


Yummmm! Mom's flaky pie crust was fantastic with it. This cleaned out 3 cups of my turkey, all of our gravy and veggies left over. If you still have left-over turkey, you can always freeze it and get it out later to make pasta salad, chili, sandwiches, soup, or whatever you are in the mood for! I also have a friend who boils the remains and then freezes the turkey broth to use later. My hubby also likes to simmer some chopped up turkey in a pan with gravy, and spoon it over toast for an open faced sandwich. The possibilities are endless, so don't waste your left-overs!

Tuesday, November 25, 2008

Junk Mail Gems now on Facebook!


I finally gave in to peer pressure a little while back and got on Facebook...now I have just created a page for Junk Mail Gems! I had to be a total nerd and become a fan of myself, but it's a little lonely over there right now. If you're a Facebook member and would like to become a "fan," check it out and be among the first to keep me company!

Friday, November 21, 2008

Have Yourself A Green Little Christmas!

It's hard to believe we are approaching Thanksgiving this week already, especially when I see that my last blog posting was on Halloween! Shame, shame on me. But, I have been busy putting out our holiday e-newsletter, fulfilling Junk Mail Gems orders for those of you who are early holiday shoppers like me...and, doing my own holiday shopping! (I've also been making a lot of fun gifts this year, but I can't tell you about those yet in case any of the receivers are reading!) Here are some ways to green-up your holiday!

Green Gifts:
Junk Mail Gems, of course, has a ton of cool gift ideas:

Hand rolled paper beads for the crafty beader,
One-of-a-kind junk mail jewelry for those eco-conscious women in your life,
Recycled speaker cable jewelry for the stereo guru,
Hand woven junk mail wallets great for men, women, teens & adults,
Woven junk mail bookmarks for the bookworm,
and many cool magnets for anyone who has a fridge or cubicle!

Be sure to check out my links page for a bunch of my favorite places to find unique and green gifts online!


Got friends who already have it all? Why not give to a charity in their name through places like Charity Gifts? You can even give a goat! I have a few of those people on my list who have everything, but I bet they don't have an adopted polar bear.

And don't forget that you can always make a gift! There are many great ideas out there on the web for making gifts and hand made gifts are always extra special. I know my family looks forward to my husband's home made wine every year, and I've always enjoyed making ornaments and personalized items for my friends and family. Check out my DIY project links on the right hand column of this blog for more ideas!

Gift Wrap:

National Geographic says, "...if every family reused just 2 feet [0.6 meter] of holiday ribbon, the 38,000 miles of ribbon saved could tie a bow around the entire planet." Some things that can easily be re-used are bows, gift bags, tissue paper, ribbon, and boxes! A lot of the gift wrap itself can be used again too if it is not shredded when opened. Gift tags can be made out of last year's holiday cards as well. There are many great ways to recycle and make your own creative gift wrap here!

Decorations:

I could not imagine Christmas in my home without a real tree. Maybe it's because I grew up with a real tree every year, or maybe it's just because my hyper-active sense of smell just loves fresh pine. Christmas trees are grown in farms, specifically for that purpose, so you are not chopping down forests. While they need to be purchased annually, a locally bought tree is much greener than their artificial counterparts, which consume a lot of energy and petrolium-based materials to make! And, who says you need to toss it to the curb when you're done? You can find a local tree recycling facility using Earth 911, or recycle it yourself by turning it into mulch or firewood. Still not comfortable chopping down a tree? Why not plant one in your front yard and have an outdoor tree year after year?!

How about lights? Whether you put up one string of lights or go all Grizwold on your property, you can cut down on the energy you use by plugging your holiday lights into a timer.

And don't forget about our tutorial for turning old holiday cards into ornaments!

Holiday Cards:

Botanical Paperworks has some really beautiful seed cards. If you are not familiar with these, they are cards made out of hand made paper, with real seeds embedded in the paper...meaning that you can actually plant the card and have it grow! They also have plant-able gift tags and party favor cards that look like they could double as little paper ornaments.

Other alternatives if you want to completely eliminate the whole physical card thing would be to send an e-card. If you don't want to use one of those free e-card sites with ready-made cards, you can always make your own electronic newsletter or email with photos and news. Or, how about actually picking up the phone and wishing everyone a merry Christmas "in person?" It may be time consuming if you have a huge list, but would surely be memorable to those people you don't see very often!

These are just a few ways that you can green your holidays...feel free to share your own suggestions with your comments, and have a happy Thanksgiving!
Related Posts with Thumbnails

What's going on in the world of Junk Mail Gems, along with other cool, hand-made "green" products, DIY projects, and more!