Monday, September 29, 2008

Product Review: Adiri Natural Nurser

I'm going to do another little product review for you green mommies out there. Nobody pays me to do these, but hey, if anyone wants to send me some kickbacks for it, I won't argue! Since my baby turned 9 months and has been demanding more food, I have had to switch from the little bottles that attach to my pump, to something larger.

I did not know to look for BPA-free bottles when I first purchased my Medela ones...I just bought them because they went with my pump. (Luckily the Medela bottles are and have always been BPA free.) But, now that I am no longer breast feeding or pumping (thanks to my little guy's 6 sharp, new teeth...I'll spare you the gory details), I did a little shopping around.

Frankly, I was getting tired of cleaning all of the parts on my old bottles...stuffing a big bottle brush through the narrow opening and then having the bristles spray soapy water all over me when I pulled it out, getting soap and a brush inside the nipple, cleaning the rings, caps, covers, etc...


I've seen these Adiri Natural Nursers written up in several of my design publications (besides running Junk Mail Gems, I'm an industrial designer), and decided to give them a whirl. Above is a photo of the two that I ordered...a stage 2 (blue) and a stage 3 (orange). I got mine from Web Vitamins because they had the best deal that I could find at $10.85.

Being a product designer and wanting to touch and feel everything, those online shopping sites never really show enough photos for me. So, for those of you who are like me, I am including more detailed photos for you...


If you're a technical product material geek like me, you will like to know that the cover, cap, and main body of the bottle (the blue part below) are made out of a polypropylene copolymer. The colored hard part of the bottle is over molded with a type of TPE, which contains some silicone (the soft clear part on top). This makes the base of the bottle more rigid, while the breast shaped part is soft (like nature intended!). The overmolding process results in a smooth, continuous feel as the nipple blends into the bottle.

Here's a close-up of the numbers (ml and ounces, they hold up to 8 oz or 240 ml)


The two bottles I bought, out of the packages:

The only difference in the 3 stages are the color of the bottle, and the number of holes in the nipple. Stage one has 2 holes, stage two has 3, and stage three has 5 holes.

Each one comes with three parts: the bottle itself, the cap, and the clear cover.


Here is a close-up of the cap with the vent:

There is a vent cover under the cap. They say you don't need to remove it to clean, so that's one less part to lose!

Close-up of the nipple...this one is the stage 2 so it has 3 holes in it:


Okay, time to try it out!

1. Slide the clear cover over the bottle and make sure it's snug against the nipple to fill it, so it doesn't leak.
2. Screw on the cap tightly.
3. Shake, if you're mixing formula like I was. (otherwise skip this step)
(step 3.5. Warm it by submerging in warm water or using a bottle warmer, although to do this you have to use the warming cap, which does NOT come with the bottle! You have to get this separate. boo!)
4. Turn the bottle over, THEN remove the cover. (Apparently doing things in the other order will make it more leaky.)

5. Give to baby and observe happiness and a full tummy!

In the past when I've given my little guy a new bottle, he has had to inspect it extensively before putting it to his mouth, sometimes resulting in a rejected bottle being thrown across the room. I was surprised at how quickly this one went straight to his mouth the minute he got his hands on it. Much like his mommy, he's a very tactile little guy and I could tell he liked the feel of this one!

I've read a lot of reviews online, a few complaining that the bottle "leaks all over the place." I really didn't notice that it leaked any more than any other bottle I've used. Of course, my baby seemed to like it so much (or was so hungry) that it really didn't leave his mouth much until it was empty. There are several things to check on the Adiri site if your bottles are leaking too much... In defense of fellow industrial designers everywhere, make sure you are actually following the instructions before posting bad reviews online! Don't assume a totally re-designed product should be used in the same way as the old one.

So, to sum things up...

The Good:
- BPA and Polycarbonate free, not to mention COOL looking!
- Breast shaped...why should it be shaped like anything else?!
- Top rack dishwasher safe (not with the heated dry cycle)
- Much easier to clean than traditional bottles
- Less parts to lose & wash

The Bad:
- You can submerge in warm water or put it in a traditional bottle warmer, but you have to buy the warming cap separate. Why doesn't it come with that?! I wish I had known when I bought them, as I would have gotten these at the same time. (FYI, as I just learned, don't just use warm tap water)
- While the packaging, cover and cap are recycleable, the bottle itself is not (the soft material). Adiri says on their website that they are working on creative recycling solutions.
- Like most GOOD design, pricier than the competition, but then it was totally worth it to me!

Overall:
Love it! Just wish it came with the warming caps!! (duh!)

For more green mommy reviews, check out my extensive cloth diaper reviews:
Cloth diapering part 1
Cloth diapering part 2
Cloth diapering part 3
Cloth diapering part 4

Make Your Own Household Cleaners + Cutting Out Single-Use Disposable Items!


Okay, I'm totally mooching off some other great bloggers today but thought these were great ones to pass on. Today I was perusing "365 Days of Trash, one man's attempt to throw nothing away for a year." It's pretty cool, you should check it out! (found via the latest Treehugger newsletter) But, while there I also checked out one of his links to Tree Hugging Family and their post including how to make 25 safe, non-toxic, homemade cleaning supplies. I'm a little leery of the recipes including vinegar, due to the fact that my hyper-sensitive nose can smell EVERYTHING. But, I'd definitely like to try out a few of these ideas!


There's also a great video on there about cutting out single-use disposable items. The man has a good point about carrying around a bag of stuff all day, often with things in it you don't care about. It's such a simple thing to carry around a fork and a re-useable water bottle and/or coffee mug. Since having a baby, I find that I already do that for him. Of course, it's automatic, out of necessity, because they don't have baby-sized spoons, or disposable sippy cups and bottles at every restaurant. (although there is no shortage of disposable bibs, changing pads, sippy cups, etc on the store shelves) Why not do the same for yourself? After all, if you're like me and are carrying around a giant bag for your baby's stuff anyway, it won't take up much more real estate. While I do use my own mug and water bottle, I have not even thought of carrying around a spoon and fork. Just shows you how automatic it comes so so many people to just take the disposable plasticware, use it, and toss it a few minutes later. Anyway, I thought it was a good post, and something I can definitely easily try starting right now!

Monday, September 15, 2008

Recycled Pop Can Chairs!

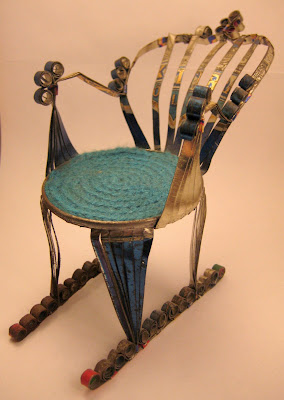
This morning I had to drop off my vehicle for some recall work to be done, and rather than sitting in the boring waiting room trying to keep my baby boy occupied for an hour and a half, we walked across the street to the thrift store. Since I had so much time to kill, I looked through all the baggies of miscellaneous stuff they hang from pegs, and found these adorable little chairs made out of pop/soda cans:


I actually collect miniature chairs at garage sales and thrift stores, which decorate my living room at home. So, these were both a unique addition to my collection, and a fun post for today!


They both unfortunately are a bit rusty, so I'm guessing they were not made too recently, as pop cans are pretty much all aluminum these days. They have cute little crocheted padding on the seats as well.


We've all been to those craft fairs where someone is selling wind chimes, airplanes, etc made out of pop cans. (yeah, I know, I'm Minnesotan...I call them POP cans!) I have not yet been able to find anything like this online as far as patterns go to make my own. But, there are many aluminum can crafting projects online. Here are just a few...

A pretty Hanging Candle holder at Creative Kismet,
Cute ornaments on HGTV.com,
Some very nice jewelry including earrings and bracelets,
A few books on aluminum art and crafts,
And an entire blog dedicated to recycled can crafts!

Saturday, September 13, 2008

Green Kids' Birthday Parties

I just received this birthday party invitation in the mail the other day from a friend of mine, and it got me thinking about green birthday party ideas!

This cute postcard invite is made by cutting out and decorating the inside of a baby rice cereal box! What a fun way to make your own invites. I thought it was very creative. Although, the creative mommy who made this warned me that if you do this, be sure that you have the "to" and "from" addresses in the right places! All of her invites came back to her because her address was on the bottom. :-( Except, of course, this one invite which miraculously made it to me!

NatureMoms has a nice posting full of great green birthday party ideas, including this paper with flower seeds embedded...a great way to make a green invitation that can later be planted! She also posts about a great idea to ask in the invites that gifts be wrapped in recycleable newspaper or fabric to avoid all the gift wrap waste.

Another good way to re-use all that gift wrap is to cut it into 8.5"x11" or 12"x12" pieces and use them as scrapbooking paper or for card making, decoupage crafts, etc. And, there's always the option of re-using it again as gift wrap if it isn't too beat up. Gift bags are a good alternative because they can be re-used many more times than wrap. You can also recycle the birthday cards you get, into new cards, gift tags, or even ornaments.

I've read a lot of moms complaining on the blogosphere about all the junk their kids come home with from their friends' birthday parties...often cheap toys stuffed into a plastic party bag with some licensed character on it. While I'm sure all the kids love getting little prizes, you know they don't get played with much past the car ride home, and the bags just end up in a landfill somewhere.

When I was little, rather than just giving everyone a bag of toys just for showing up, acquiring them would become part of the fun. Instead of store bought plastic bags, each kid got a brown paper lunch bag, and spent time decorating it with markers, stickers, and collage (recycling magazines and other mail with pictures). We would then use the bags to collect our findings on a "sucker hunt." My parents would hide those safety suckers with the loop handles around the house and yard and everyone had a blast searching for them, much like an Easter egg hunt.


Back then my mom was not trying to specifically plan green activities, but it ended up being much more eco-friendly than what you see at many parties today! After the party, the kids could eat their prizes, and the paper bags could be recycled.

Here's my little guy (below), at his cousin's 1st birthday party earlier this afternoon! I can't wait to try out some of the cool ideas out there for his upcoming 1st birthday, and many more to come! Got any of your own eco-friendly party ideas? Post a comment...we'd love to hear them!

Wednesday, September 10, 2008

"Gathered Together" 2009 Calendar


I just saw this beautiful calendar on one of my favorite shopping sites and had to share. Since I was a little kid, I've been a huge fan of collage and making 3D stuff out of paper and found objects. My mom could never throw away a cereal box without me or my siblings wanting to turn it into a robot. This is a collaboration between Jill Bliss and Saelee Oh, who both have more great work on their sites worth checking out. It's even printed on recycled paper with veggie-based inks!

It also reminds me of a post card illustration I created a couple years ago with the same fantasy-like feeling, only I did this one digitally in Photoshop, entirely out of pieces of photos I had taken of plants and flowers. But, this makes me want to get out my glue and scissors and get back to doing things the old fashioned way. I could definitely do something fun with Junk Mail as well as you know I have plenty of it!

Monday, September 8, 2008

New Fall Products Now Availabe!

I am really excited to announce some new products, now available on JunkMailGems.com! I have been working on these for months, searching for and experimenting with just the right methods and quality materials.

First, we have some great new pins! Each pin is made out of one catalog page and has a thick, glossy, clear coating on the face:


We also have two new pendant necklaces available! These necklaces have glass pendants, available in square and round, with colorful junk mail mounted to the back side. Each pendant is hanging on a black leather cord with a strong magnetic closure.


Closeup of the magnetic closure:


Like all products that I sell that are made out of my recycled junk mail, the colors and patterns in these items will vary. No two are alike! If you are looking for a specific color range, please feel free to email me before you place your order. I would be glad to see if I can find a particular color for you!
Related Posts with Thumbnails

What's going on in the world of Junk Mail Gems, along with other cool, hand-made "green" products, DIY projects, and more!