Showing posts with label upcycle. Show all posts

Thursday, November 17, 2011

Amazing recycled ball gowns

I know, it's been forever since I've posted!!  Life sure is getting busy these days!  I came across this blog post today and just had to share these ball gowns made from recycled materials.  Check out the link to see more.


Also, here are a few other posts you may enjoy from my other blog:

Tuesday, September 20, 2011

Junk Bonanza Vendor Spotlight: MakeShift Accessories

 Alright, I got a little bit of a late start this week but here's the first of a few Junk Bonanza vendor spotlights I promised!

Today's vendor spotlight is on artist Devin Johnson of Makeshift Accessories

Love the signage!

Devin Johnson, the creative engine behind MakeShift Accessories
 Devin turns a very interesting selection of recycled, antique, salvaged, and other found objects into real things of beauty...

I was really drawn to his amazing metal cuffs, which showcase some unique illustrations and typography from various found metal objects:


As an industrial and graphic designer who has both engineered things and illustrated their components and use instructions, these really caught my eye, especially this one above with assembly instructions.  

 These are just way cool...are they gears?  They seem too pretty to be!


Cool money clip embellished with a key...I love the little exposed hardware details.

Rings...super cool...

Colorful array of rings made from street signs!
Cuffs made from street signs...check out the reflecting flash! I think I need some of these, you know, for safety reasons while walking out at night.  Yeah, that's it...good justification!!

Devin makes some awesome leather cuffs too.  I have a thing for keys!

Sweet curly fork and leather cuff
Devin gets the bragging rights of being the one and only vendor at the Junk Bonanza to have inspired me to whip out my wallet and buy something! :-)


Here's the little beauty I picked up at this year's Junk Bonanza from MakeShift Accessories:


Isn't it cool?!  It was the last blue one left...and according to Devin, it is made from an antique metal ruler from Italy, and he hasn't been able to find anymore since.

He had a bunch of silver rulers with black letters, but this one jumped out at me for the contrast.  Some upcycled objects I love for how subtle they are about what they're made of....this one I love for how much it screams "RULER!"  Plus it's one of those tools I use a lot as a designer so it was very "me."

So, be sure to stop on over to Devin's website, as well as his Etsy shop, and check out his Facebook Page!  Thanks for the awesome conversation piece, Devin!  :-)

Tuesday, July 5, 2011

Drop-Side Cribs: Immobilize? Repurpose? Recycle?

I held a garage sale last week, and two days before our sale, it was declared officially illegal to re-sell or even donate a drop-sided crib.  Of course, this being our "done having babies" sale, I had a nice drop-side crib all ready to sell.  It now leans against the side of our garage, awaiting it's fate.  Let's just say I'm glad I only paid $30 for it at a garage sale, so I'm not out much cash.

If you have a drop-sided crib that you'd like to keep using, you can get an immobilizer kit that does just that...immobilizes the sides, making it safe to keep using.  For cribs manufactured from 2000-2009, many manufacturers are offering these kits for free.  If your crib manufacturer is not on the list, you can purchase one online as well for $10.

However, if you're like me and you're done having babies (unless God has other plans), and can't sell your crib or donate it, what do you do with it? 

The first thoughts that came to my mind were to make some kind of giant tomato cage or trellis for vines. My husband's idea was to chop it to bits and roast marshmallows over it in one of our outdoor fire pits. My neighbor suggested I see if a local antique shop would like to use it to display antique dolls in.

I did a little web surfing and came across this great post at "Easy Frugal Living" full of ideas to repurpose old cribs into useful items like benches, photo display boards, and even wall art...

"Vintage No. 35" has a great idea to use the springs as a jewelry display stand:

"Upcycle" also posted many great ideas, including a really cool craft station, a cart, a work bench, and a hutch to name just a few...


You can Google "repurpose crib" and find many other great ideas out there, but these are the first few that caught my eye.  I'd love to hear your ideas if you can think of anything else...we really don't have room for our big, white, drop-side crib in our house but if I can find some cool way to re-use it before my hubby takes his chainsaw to it, it would make a fun tutorial post!!  ;-)

Wednesday, June 15, 2011

Recycled Planter Roundup!

What's greener than upcycling something? Why, planting something green IN that something, of course!!

It's that time of year when plants are springing up all over the place.  Well, we're lagging behind a bit here in MN after a winter of record breaking snowfall, but that makes us appreciate the greener things in life all the more. 

Since moving into our new home, which is landscaped with beautiful perennials everywhere I look, I have LOVED watching our new yard reveal itself.  I'm also excited to plant some stuff, now that our yard isn't all shade. With so much landscaping already done though, it's hard to find places to plant things. So, I have been inspiring myself with some fun recycled planter ideas online, as a way that I can still plant things elsewhere...on the deck, the patio, along the sidewalk, etc.  Here are a few fun recycled planter ideas that caught my eye! 

Check out this cool recycled barrel planter over at Design Sponge. Makes me wish I had a barrel to recycle!

Here's a cool little urban garden in London, where they've turned old 55 gallon drums and plywood into planters with built in seating.

Even old tires can be turned into pretty cool giant planters.

This recycled chandelier is just WAY too cool.  That's it...I'm putting old chandeliers on my garage sale and thrift store shopping list!!

How about an old book?  This is super cool.  I'm thinking, if you used a book about gardening, all the better.  I wonder if you couldn't stack several of these to make a larger "pot."  This would be such a neat gift for a teacher, or a housewarming gift for a book lover.

And, of course, I have to end with a link back to one of my old posts where I turned a bbq grill into a planter!

Happy [creative] planting! :-)

Saturday, November 27, 2010

Pretty Pencil Box Pendant

I just looked through my latest Uncommon Goods catalog and just had to share this awesome pendant, made with slices of real colored pencils.  I just LOVE how they combined the round cross-sections on bottom with the angled cuts on the top.
I have the resin and molds to make something like this, but am not sure I'd want to attempt the precise cuts it takes to get these all sliced just right.  These are hand made in Massachusetts by someone who knows what they are doing!  What a great way to use up some of those little pencil stubs that are too short to draw with!

Pick one up for $65 at Uncommon Goods...they also have matching pins in a circle or heart shape ($38), as well as a teardrop necklace ($60).

(Here's a previous post with more colored pencil jewelry, too)

Friday, November 19, 2010

DIY Recycled Ornaments from "Michele Made Me"

Check out these pretty plastic bottle ornaments from Michele Made Me, along with instructions to make them yourself!

She also has another tutorial to make these adorable little greenhouse ornaments from recycled plastic.  Love them!  Plus, who doesn't want to gaze into a tropical little greenhouse when there are inches of snow on the ground? Her ornament tutorials appear to be an ongoing series...can't wait to see what she comes up with next!  Thanks, Michele!!

Thursday, October 21, 2010

DIY Scrabble Serving Tray

Just thought I'd share another little project I finished recently...a scrabble themed serving tray!  This will be a Christmas gift to my Grandma, who is both an excellent hostess and Scrabble player, so I think it will fit her well.  Luckily she does not have a computer so I can share this with all of you before Christmas.  ;-)

I picked up this perfect serving tray for $4.99 at Saver's a few weeks ago.  I considered this one perfect for this project for a couple reasons...1) The tray itself is flat, 2) The plastic handles are easily remove-able with a couple screws. I have been scouring the thrift stores for weeks to find an old Scrabble game with no luck...until last weekend when I stopped by a garage sale and found one for $0.25 cents.  Score!!

After giving the tray a good cleaning, I un-screwed and removed both of the plastic handles, with plans to replace them with something more fitting later...


I spread some glue around and stuck down all of the letters.  This tray held one entire game's worth of Scrabble tiles.

Here they sat to dry.

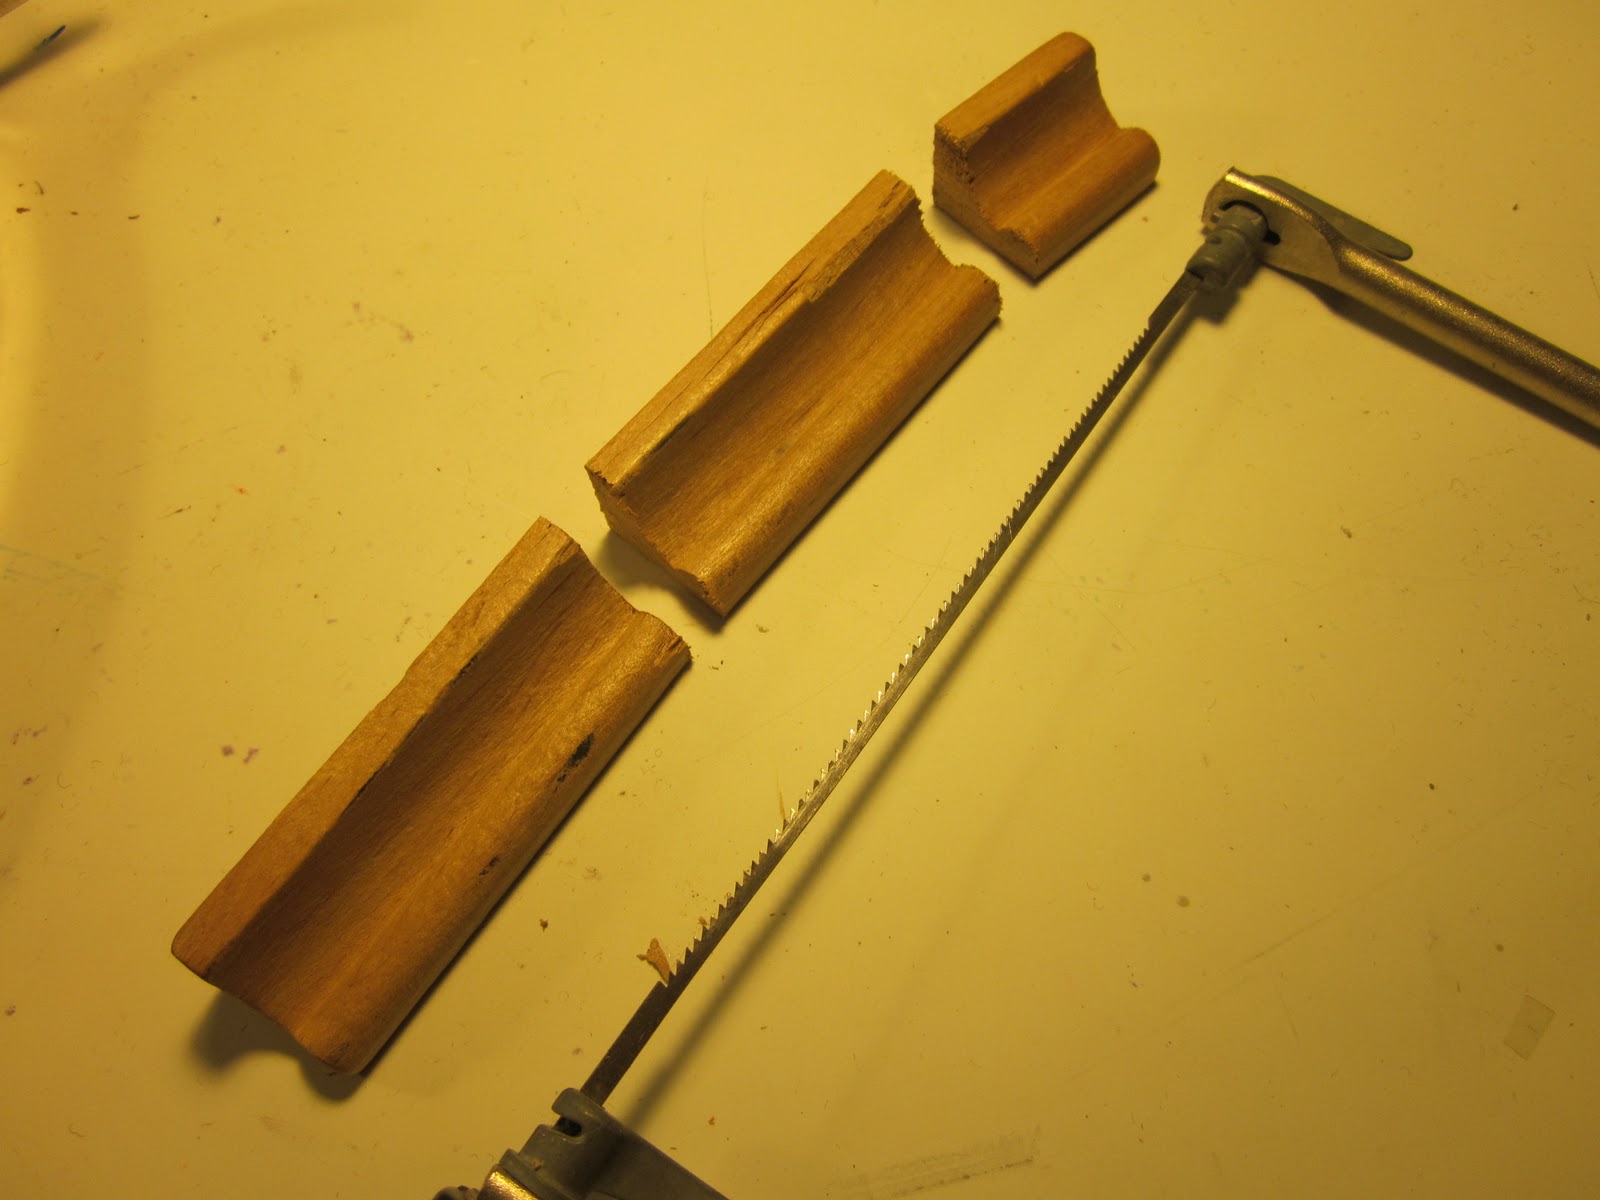
 Next, I thought it would be fun to use the old wood letter trays as new handles.  So, I measured and marked the tray off of the existing plastic handles, and cut them apart with my coping saw.

 Be sure to pre-drill the holes so you don't split the wood when you attach these.

 Once the holes were drilled, I screwed them into place...I think it added a cool touch! 

If you have enough letter tiles left, it may be fun to glue a few into the tray on the handle too.  Maybe even spell something fun.

 The next day, after the glue was really dry, I mixed up a batch of EnviroTex Lite resin to pour over the whole thing.  It's the same stuff I used on the top of my train table.

 I used a wooden paint stir stick to mix the resin and then to help spread it across the tray, making sure all of the tiles were covered.

 As it dries, check on it every few minutes, and exhale over any bubbles that come to the surface...the carbon dioxide makes them pop so you have a crystal clear coating!

Aaaaand, we're done!  Pretty fun project!  If you didn't want to use clear resin, you could also grout it like a mosaic which would also look very cool.  I'd recommend sealing the tiles in a clear varnish before applying any grout, to ensure that they wipe clean and the wood grain doesn't hold onto any haze from the grout.

So there you have it...one Christmas present down, many more to go!

Friday, October 8, 2010

Cool Recycled Gifts in Northern Minnesota

Okay...well, Google has given me a more time consuming work-around method to get my photos up until they figure out the issue, which is apparently with their uploader on their end.  So, here are some things I've been waiting to share!

A couple weeks ago we took our annual family vacation to northern Minnesota, not far from Nisswa, which is my favorite little town to shop in when we're in the area. 

One of my favorite stores there is called Zaiser's, and is full of cool, well-designed gifts, and many fun recycled finds.

They have a great little section of toys, and I loved this shelf of hand puppets.  Each one is unique, handmade in Canada by Cate and Levi out of all natural and reclaimed materials.  And to top it all off, 10% of their profits go to help children in need.

I also loved this display of button rings and little felt flowers...

This recycled beer bottle dish by From The Blue Bag LLC,

and these recycled magazine cuffs and paper beads from Refashioned, much like my own!

 I went home with a recycled bike chain bracelet.  See you next year, Nisswa!
Related Posts with Thumbnails

What's going on in the world of Junk Mail Gems, along with other cool, hand-made "green" products, DIY projects, and more!