Showing posts with label paper. Show all posts

Friday, May 20, 2011

Recycled Paper Garland: A Great Project for the Kids!

We have this sweet lady across the street who saves fliers and various pieces of scrap paper for my boys to color on.  The other day we were visiting in our cul-de-sac and she ran back in the house to bring me a stack of colorful fliers.  So, since it's raining and we're stuck inside, today I thought we'd utilize this colorful paper and make a project...paper garland!  This is a great project to recycle scrap paper including junk mail!

Supplies needed:
- Paper (colored and/or white)
- Scissors
- String or yarn
- Toothpick or skewer and some tape (or a blunt plastic tapestry needle that's safe for kids)
- Glue
- Crayons, Markers, etc
- Hole punch
- Optional extras: paper edger scissors, paper crimper, paper punch, glitter, stickers, etc...

Our stack of paper from our neighbor.  (It's all blank on one side)

So, basically we made various kinds of beads out of paper to string on our piece of yarn...

 This project is great for short little attention spans because there are many different things to do...color, cut, glue, punch, string, etc.  I started by having Sammy fill the white pages with colors. While he did that I got the string and "needle" ready...

 
I swear I use these bamboo skewers for craft projects more often than for cooking.  I cut one in half and used some masking tape to secure one end of yarn to it, and had a nice "needle" that was easy for kids to use.  On the other end I tied a bread bag tab just to keep the beads from sliding off.
Once I got that ready Sammy had a colorful piece of paper to turn into tube-shaped beads...
 
I cut it into a couple strips.
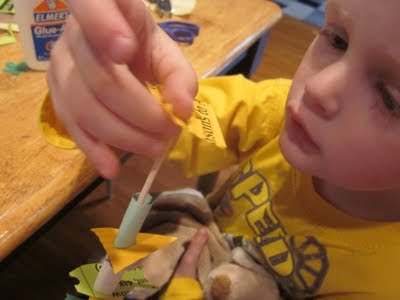
...then rolled them up the long way and glued it into a long tube.
 
 Hold the tube with the seam against the table for a few seconds for the glue to grab hold and dry a bit.

 
I did this with pieces of the colored paper too. Some of them I let the writing show to add a little graphical interest...others I rolled so the blank side showed.
Now have some fun looking through the tubes or pretending they are walrus tusks or giant straws...

 
 Next we get to play with SCISSORS!  Cut the tubes up into beads!

 ...meanwhile, Toby is having a blast tearing up my kitchen.  This is one of his favorite activities.  But, since he's still at the crayon eating stage, I let him trash the place explore while we do projects. 
 I'm not sure where you even get these things, because I found them at a garage sale, but Sammy had a blast rolling strips of paper through this paper crimping tool.  We then used the crimped paper in some of our other "beads."

Another type of bead we made was just a strip of paper folded back and fourth in a zig-zag...

 ...Then we used a hole punch to go through the whole thing. You can also easily make flat beads by cutting different shapes and punching holes in them.  We did circles, squares, triangles, and of course, fish.


Here are some of our beads. It might be helpful to you to put them in two piles...the 3-dimensional ones and the flat ones. (an opportunity for your child to learn how to sort things)  This will help with threading them, because it works best to alternate flat ones and 3-D ones.  (thus preventing smaller tubes from slipping inside the larger ones) Then you can tell your child to alternate between the two piles.
 A little tip, if you're making fish, you can easily make mouths with a hole punch only half way on the paper. ;-) Depending on your child's level of patience and attention span, they could even decorate/color each fish.  (Milk this sitting-down-being-busy thing for all you can!)

 Now you can really keep your kiddo's fingers busy with threading their beads on the string!  Sammy didn't last for all of that part so Mommy finished it up.  But I figure, hey, if I can get him to sit and work on something creative with me for even a few minutes every day, I'm doing my job!
 Don't be afraid to let your kid's creativity take over and side track from the project.  Their little heads are full of great ideas!! Sammy picked up one of his little "tube" beads and said "We can make it into a tiny little cup!"

 ...to which I replied, "That's a GREAT idea!  I'll make a handle!"  And, we made a tiny little cup.  Well, proportionally it looks more like a pitcher, but he got a kick out of it.


 Sipping some pretend water from our teeny tiny little cup!  Sammy had another great idea too.  When we strung a white tube between two flat squares he said, "Momma! It's a paper s'mores! Let's make paper s'mores!"  (And of course, we DID, complete with a paper fire pit to roast over, but I'll save that one for another post!)

So you see, a little side-tracking is great for the imagination! Now, back to the project at hand...

 Concentrating on stringing the beads. I think the long length of the bamboo skewer as opposed to just the end of the string made it easier to feed the string through the beads.

 We got quite a string going!


 Sammy showing off his awesome paper garland!  If you don't have the patience to make a long string, you could also do these as little vertical dangling decorations too, much like the hearts we made on Valentine's day.
 So much fun!  I hung it on the underside of our fireplace mantle, where it currently waits for Daddy to come home to see!
 There are an infinite amount of things you can do with paper. This is one project that ANYONE can do.  Feel free to go nuts on your paper decorating too...glitter them up if you want!  Heck, you can even throw in some cheerio's or dry pasta in there.  Anything with a hole in it goes. Got little girls? Make it into a necklace!

This project can so easily be adapted to go along with any holiday theme!  With Memorial day coming up, try making this with red, white and blue paper and cut some star shapes.  You'll have some one-of-a-kind decorations for your Memorial day bbq and a great conversation piece!  Put some supplies out on a little table if you have kids coming over and they can make their own to take home!
Enjoy those rainy days....Happy paper recycling! :-)

Friday, April 22, 2011

Earth Day Discount! 20% OFF Junk Mail Gems this weekend!

Happy Earth Day!! 

In honor of Earth Day this year, I am offering all of my loyal readers 20% off your Junk Mail Gems order! Just enter the coupon code "EARTH2011" at checkout! 

I just recently switched my entire site over from Paypal to Google Payments, and one main reason was so that I would have this ability to offer coupon codes and promotions.  So, this is my first crack at a coupon code.  Hopefully it works...if not, please let me know! ;-)  There are NO minimum orders required, and this coupon is good all weekend, NOW through Easter, April 24, 2011! (One coupon use per customer) Use it to get a jump on your Mother's Day shopping, or just treat yourself for being the earth friendly bargain hunter you are!

And since I don't have anything else amazing to share, I'm going to mooch off of some other bloggers who were more on-the-ball this Earth Day and prepared more fun material for you...

ReadyMade posted a link to a great tutorial for making your own plantable paper!  Very cool.

Hop on over to Inhabitots for 5 fun ways to celebrate Earth Day with your kids!

However you choose to celebrate, have fun! :-)

Friday, October 8, 2010

Cool Recycled Gifts in Northern Minnesota

Okay...well, Google has given me a more time consuming work-around method to get my photos up until they figure out the issue, which is apparently with their uploader on their end.  So, here are some things I've been waiting to share!

A couple weeks ago we took our annual family vacation to northern Minnesota, not far from Nisswa, which is my favorite little town to shop in when we're in the area. 

One of my favorite stores there is called Zaiser's, and is full of cool, well-designed gifts, and many fun recycled finds.

They have a great little section of toys, and I loved this shelf of hand puppets.  Each one is unique, handmade in Canada by Cate and Levi out of all natural and reclaimed materials.  And to top it all off, 10% of their profits go to help children in need.

I also loved this display of button rings and little felt flowers...

This recycled beer bottle dish by From The Blue Bag LLC,

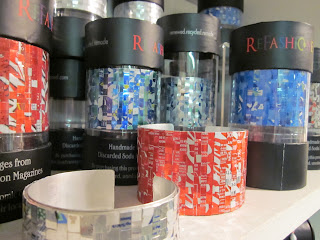
and these recycled magazine cuffs and paper beads from Refashioned, much like my own!

 I went home with a recycled bike chain bracelet.  See you next year, Nisswa!

Tuesday, August 3, 2010

DIY Travel Play House using a Recycled McDonald's Happy Meal Box!

Okay, so I promised you a new tutorial on how you can recycle your McDonald's Happy Meal boxes...here it is!  I have created pdf patterns that you can download for free over at my design site.  Check out my step-by-step photo instructions at my IDMommy blog!

Ignore this little Ronald telling you to throw away your box...
...and make a little house out of it instead!

Thursday, July 22, 2010

Recycled Kids' Art Project: Used Magazine Collage!

Okay, I'm mooching off of myself again, but I thought this would be a good post to share here on my Junk Mail Gems blog too!  I used to make collages all the time when I was little.  Here's how you and your kids can have fun turning old magazines into art too!

Wednesday, September 10, 2008

"Gathered Together" 2009 Calendar


I just saw this beautiful calendar on one of my favorite shopping sites and had to share. Since I was a little kid, I've been a huge fan of collage and making 3D stuff out of paper and found objects. My mom could never throw away a cereal box without me or my siblings wanting to turn it into a robot. This is a collaboration between Jill Bliss and Saelee Oh, who both have more great work on their sites worth checking out. It's even printed on recycled paper with veggie-based inks!

It also reminds me of a post card illustration I created a couple years ago with the same fantasy-like feeling, only I did this one digitally in Photoshop, entirely out of pieces of photos I had taken of plants and flowers. But, this makes me want to get out my glue and scissors and get back to doing things the old fashioned way. I could definitely do something fun with Junk Mail as well as you know I have plenty of it!

Thursday, May 15, 2008

Amazing Paper Art


It is really amazing what a creative person can do with something as simple as a single piece of paper. While I sell my products made with junk mail, I've also been exploring what kinds of frame-able art I can do with it as well. I did a posting a while back with some amazing work done just with cardboard, and thought this was a nice version of work done just with paper.

You may have seen this in a chain email stating it was part of a contest at an art museum in DC (where the name of the museum is misspelled even), but the emails are bogus...it is all work done by one artist, Peter Callesen. Check out his amazing work! I thought I'd give credit where credit was due, rather than passing on the made up email!


While you're at it, check out some of these other amazing paper artists:
Jen Stark's amazing and colorful card stock sculptures
Laura Cooperman's super intricate work
Su Blackwell's clever and creative cut book art, &
Javan Ivy's incredible paper animation!
Know of some more? Leave a comment!

Wednesday, March 5, 2008

NEW Security Envelope Pattern Beads!

Have you ever paid attention to the inside of security envelopes that you get in the mail? There are SO many unique graphic patterns in there that so easily go overlooked. Here is a collage I made with some of the patterns I have collected over the last couple years:


Well, in the subject of security envelope patterns, I have some good news and some bad news.
The BAD news is I'm discontinuing my mirrors and buttons that are made out of security envelope patterns. The reason is that I've found that the paper is too thick to work well in my button making equipment, causing me to waste several mirrors before getting one to work. So, in the spirit of being green, rather than continuing to waste materials I will no longer be selling those items.

However, the GOOD news is that I am coming up with some new ways to re-use these envelopes! I am now offering some sweet hand-rolled paper beads that showcase this unique material, available in blue, black, or both!


You can purchase the loose beads in lots of 10 (with a choice of blue, black, or a mix of both), or already made into earrings and necklaces! Each bead is about 1/2" long and make quite a one-of-a-kind green statement!

Monday, April 16, 2007

Hamster Powered Paper Shredder


And here I am wasting perfectly good electricity shredding my junk mail for packing material... I need to take a lesson from Mr. Tom Ballhatchet and his clever hamster powered shredder. I grew up with several hamsters so I know that they love running in their wheels and have plenty of energy to share. The only problem is, being that the cuddly little furballs are nocturnal, I'd have to stay up until the wee hours feeding paper through!
Related Posts with Thumbnails

What's going on in the world of Junk Mail Gems, along with other cool, hand-made "green" products, DIY projects, and more!