Showing posts with label repurpose. Show all posts

Tuesday, September 20, 2011

Junk Bonanza Vendor Spotlight: MakeShift Accessories

 Alright, I got a little bit of a late start this week but here's the first of a few Junk Bonanza vendor spotlights I promised!

Today's vendor spotlight is on artist Devin Johnson of Makeshift Accessories

Love the signage!

Devin Johnson, the creative engine behind MakeShift Accessories
 Devin turns a very interesting selection of recycled, antique, salvaged, and other found objects into real things of beauty...

I was really drawn to his amazing metal cuffs, which showcase some unique illustrations and typography from various found metal objects:


As an industrial and graphic designer who has both engineered things and illustrated their components and use instructions, these really caught my eye, especially this one above with assembly instructions.  

 These are just way cool...are they gears?  They seem too pretty to be!


Cool money clip embellished with a key...I love the little exposed hardware details.

Rings...super cool...

Colorful array of rings made from street signs!
Cuffs made from street signs...check out the reflecting flash! I think I need some of these, you know, for safety reasons while walking out at night.  Yeah, that's it...good justification!!

Devin makes some awesome leather cuffs too.  I have a thing for keys!

Sweet curly fork and leather cuff
Devin gets the bragging rights of being the one and only vendor at the Junk Bonanza to have inspired me to whip out my wallet and buy something! :-)


Here's the little beauty I picked up at this year's Junk Bonanza from MakeShift Accessories:


Isn't it cool?!  It was the last blue one left...and according to Devin, it is made from an antique metal ruler from Italy, and he hasn't been able to find anymore since.

He had a bunch of silver rulers with black letters, but this one jumped out at me for the contrast.  Some upcycled objects I love for how subtle they are about what they're made of....this one I love for how much it screams "RULER!"  Plus it's one of those tools I use a lot as a designer so it was very "me."

So, be sure to stop on over to Devin's website, as well as his Etsy shop, and check out his Facebook Page!  Thanks for the awesome conversation piece, Devin!  :-)

Tuesday, July 5, 2011

Drop-Side Cribs: Immobilize? Repurpose? Recycle?

I held a garage sale last week, and two days before our sale, it was declared officially illegal to re-sell or even donate a drop-sided crib.  Of course, this being our "done having babies" sale, I had a nice drop-side crib all ready to sell.  It now leans against the side of our garage, awaiting it's fate.  Let's just say I'm glad I only paid $30 for it at a garage sale, so I'm not out much cash.

If you have a drop-sided crib that you'd like to keep using, you can get an immobilizer kit that does just that...immobilizes the sides, making it safe to keep using.  For cribs manufactured from 2000-2009, many manufacturers are offering these kits for free.  If your crib manufacturer is not on the list, you can purchase one online as well for $10.

However, if you're like me and you're done having babies (unless God has other plans), and can't sell your crib or donate it, what do you do with it? 

The first thoughts that came to my mind were to make some kind of giant tomato cage or trellis for vines. My husband's idea was to chop it to bits and roast marshmallows over it in one of our outdoor fire pits. My neighbor suggested I see if a local antique shop would like to use it to display antique dolls in.

I did a little web surfing and came across this great post at "Easy Frugal Living" full of ideas to repurpose old cribs into useful items like benches, photo display boards, and even wall art...

"Vintage No. 35" has a great idea to use the springs as a jewelry display stand:

"Upcycle" also posted many great ideas, including a really cool craft station, a cart, a work bench, and a hutch to name just a few...


You can Google "repurpose crib" and find many other great ideas out there, but these are the first few that caught my eye.  I'd love to hear your ideas if you can think of anything else...we really don't have room for our big, white, drop-side crib in our house but if I can find some cool way to re-use it before my hubby takes his chainsaw to it, it would make a fun tutorial post!!  ;-)

Tuesday, October 26, 2010

New Uses for Old Broomsticks!

I picked up a few old magazines from the 1920's the other day for $0.55 cents each at the thrift store, thinking the pages and ads may be fun material to decoupage or make other things with.  Just had to share this little article on "New uses for old broomsticks!"

Whether we call it "recycling," "upcycling," "repurposing," "re-using," or "DIY," it's not a new idea! Too bad so many brooms are made from metal tubes now...a lot harder for the average person to convert into something else!

Friday, September 24, 2010

Welle Designs: Turning Vintage Finds into New Treasures

I am in the process of sharing what I saw at this year's Junk Bonanza in Shakopee, and for today's vendor highlight I would like to share the work of Lauren & Lori Welle of Welle Designs.

I've seen these cool bowls before made from old records, and they had a fun selection of them at a great price.  My mom bought a couple as Christmas gifts.

I've always loved these cool ticket bowls too!! Wouldn't they look great filled with popcorn on movie night?

I just recently shared some message boards made from vintage trays, and they had some as well that had ribbons to hang on the walls (Above). I really like this cute and simple idea of the "message block," shown above in front of the tray.  The little block of wood has chalkboard paint on the front, and a hole drilled in the top to place a piece of chalk!  Love it!
As you can see by the little hand in this picture, Sammy was drawn to this cute record clock with game pieces and a bingo card in the center.  "No touching, Sammy!!"
I really liked this tray on display, covered with bottle caps and a thick, clear resin, which Lori described as "just an experiment."  Sometimes the one-off, experimental items really get a lot of attention.  It reminded me of my last year at the Craftstravaganza when I had a couple junk mail decoupaged TV trays out for display purposes.  They weren't even for sale but people were very interested in them!

If you'd like to see more of Welle Design's work or contact them to purchase, be sure to check out their website!

Friday, September 17, 2010

Junk Bonanza 2010


I just returned to my studio after an overwhelmingly inspirational visit to the Junk Bonanza in Shakopee, MN! Described as "the best junk roundup in the Midwest," there is nothing junky about it!  I would describe this even as being like a walk through a really cool, antique flea market where everything has already been "upcycled" into quirky, creative gifts.  These are the people who scour thrift stores, yard sales, flea markets and antique shops for cool treasures and old "junk," apply their creative juices, and give everything a new life.


As a display designer myself, I found it equally as exciting just looking at the beautifully designed booths.  You can tell that every booth and display was designed for people like me, by people like me, who are easily drawn in by neat old treasures and recycled art. Walking through the aisles of creativity was like a constant struggle between the cool stuff pulling me into the next booth, and the desire to run home to my studio and start making things!  Many of the vendors were not only catering to those who want to purchase their items, but also those of us who like making things ourselves, by offering up bins and bins of little found objects just screaming to be made into something.


I went with my very artistic and creative mom, who so graciously offered to come along and help me maneuver the crowds with my two little boys in strollers.  With two little ones, we were only able to stay for a couple hours.  So, I didn't get to see EVERYTHING, but got a bunch of photos.  So many, in fact, that I can barely digest all of them myself, let alone overwhelm you with one post that covers them all.  So, I am going to post some more photos over the next few days from a couple vendors who caught my eye during the event.  Stay tuned for more photos and links to come!

Until tomorrow, here are a few more photos from the morning...


Friday, June 11, 2010

Old Chair Turned Outdoor Swing!

I always find funky old chairs at garage sales and thrift stores that I'd love to make over, but just don't have the space to acquire them.  That's why I got excited about this great way to repurpose an old chair into an outdoor swing!  I just might be able to utilize an old chair after we move into our potential, hopeful, new house some time in the hopefully near future!  Read the full blog post from Peppertowne, here! (via ApartmentTherapy)

Tuesday, May 18, 2010

Clever Lego birthday invitations

I LOVE doing creative birthday parties (see my 2-yr-old's Space/Robot party post), so this Lego birthday invitation idea really caught my eye.  In the spirit of recycling, if I did this I'd probably pick up a bag of Legos at my local thrift store...while they still often charge quite a bit for Legos at thrift stores, it would still be cheaper, greener, AND much more memorable than any paper invite!  I could totally see a kid taking this apart (after Mom has written it on the calendar and rsvp'd of course), tossing the pieces into his or her Lego stash, and remembering the fun they had that day the next time they come across one of these bricks!

Not sure if these would be the type you'd mail to someone, unless you glue the pieces together and ship in a padded envelope, but I'd definitely hand these out to family and friends in person.  Plus, it would be fun to see their reaction! This will surely go into my file of ideas to be pulled out next time I'm looking for a birthday party idea...maybe for the big oh-three! (via Inhabitots)

Thursday, May 13, 2010

Recycled Craft: Jug Heads!

Tossing your empty jugs into the recycle bin rather than the trash is great and all, but why not give them one more life before recycling and repurpose them into wall decor?

I just had to share this great recycled craft idea from Family Fun magazine.  Click the link to get instructions to turn the jugs and other miscellaneous plastic packaging into cute, colorful "jug heads!" I just love how they used those little plastic sock hooks to make a smiley face on the guy in the lower right corner.  So clever!

I know it's meant to be a kids' craft, but I just might have to make some of these myself. They'd really brighten up the laundry room!

Monday, March 15, 2010

Spring has Sprung!

Okay, so it's not officially spring until this Sunday. But, when the temperatures reach a record-breaking mid-60's here in Minneapolis, spring has sprung in my mind!


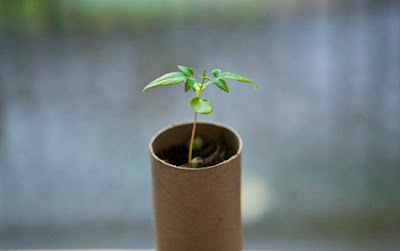
Here's a spring-y idea for you that a friend of mine recently shared via Facebook by Bonsai Aphrodite: How to make little seed pots out of toilet paper rolls!

Thursday, April 16, 2009

A Peek into the Junk Mail Gems Studio

I've been having fun lately recycling some things into storage in my studio and thought I'd share. Here is a photo of the view of the wall right above my drawing board/work table where I make all of my Junk Mail Gems products:


The wood ledge that the jars are sitting on I got at Ikea in their "as-is" section for $2 and screwed it to the wall to get some of my "stuff" up off of my desktop. You can see on the front face of it I've stuck some peel-n-stick velcro from the hardware store. Then, I put a little piece of the opposite side of the velcro on little things like my computer remote, letter opener, etc...another easy way to store little things you like to have at your fingertips all the time. On the bottom right corner is, of course, my Junk Mail Gems scrap paper box where I recycle my discarded computer printouts into scratch paper. The white board, of course, I found at a local thrift store for a couple bucks!


These are really just food jars. I've soaked the labels overnight in water to easily remove them, and then spray painted all of the lids silver for a more consistent look. They work great for storing little things like my recycled junk mail beads!

I also love to use soup cans and other vegetable cans for holding pens, pencils, and strips of junk mail waiting to be transformed into beads. I have them scattered around my studio as I use tons of them when doing my design work. Here is a can of white board markers that I have glued a row of magnets to, so that I can stick the can to my magnetic white board:


So, there are a couple ways that I like to incorporate some repurposed items into my studio! I am really excited that we are about to start a home remodel this weekend, moving some rooms around, and eventually that means I will be getting a whole new studio. Stay tuned for some shots of my new office "suh-weet" that I am currently designing!

Wednesday, April 15, 2009

What to Do with Mylar Balloons?

What do you do with those shiny, mylar balloons after the party guests have gone home, a week or two passes by, and they start to shrivel up and sink to the ground? I still have a bunch of balloons barely floating in my studio from my son's 1st birthday, and onen from my own birthday last month, which made me think about how I could reuse them. Sure, we can stop buying them, but you may still receive them as gifts anyway from friends and family, especially if you've spent any time in a hospital. (While latex balloons are biodegradeable, they are not allowed into hospitals to protect those with latex allergies.)

Re-Use as Balloons Again:
There is no reason to toss them out and keep purchasing them year after year when they are so easy to deflate and re-use! Cut off or un-tie the string/ribbon from the balloon. Then, simply stick a tube or straw up into the hole until it goes far enough to reach the inside, letting the remaining air out of the hole:


Don't forget to have fun inhaling some of that helium and amuse your kids by singing "Lollipop Guild!" You can now flatten and fold it up, and have it re-filled with helium for your next party.

Use it as a gift bag
Cut the bottom of the balloon off so there is an opening, and insert a gift. Gather the opening together and tie it closed with some ribbon (maybe even the ribbon that was tied to the balloon!). For smaller gift items, you can cut the balloon in half and wrap two with one balloon. Or, separate the front and back and use it as regular gift wrap. Either way, don't forget to add your recycled greeting card gift tag!


Craft Material:
Add them to your box of art & craft supplies for yourself and/or your kids. Shiny paper is a pretty cool addition to a collage! You can also use them as scrapbooking material, as I have mentioned in the past, or to make gift cards and placemats. It's a great way to preserve another part of your child's birthday party, by including a balloon in his or her scrapbook!

Etc...
Shred them and turn them into confetti.
Cut strips and attach them to a hair clip for a festive accessory.
Tie strips to your fence to scare animals away from your vegetables.

...I'm sure you creative readers have more ideas so feel free to comment with more!
Related Posts with Thumbnails

What's going on in the world of Junk Mail Gems, along with other cool, hand-made "green" products, DIY projects, and more!